How to Make an S in a Book How to Make Folded Book Art Letters
Last Updated on December 23, 2020 by Irene Seto
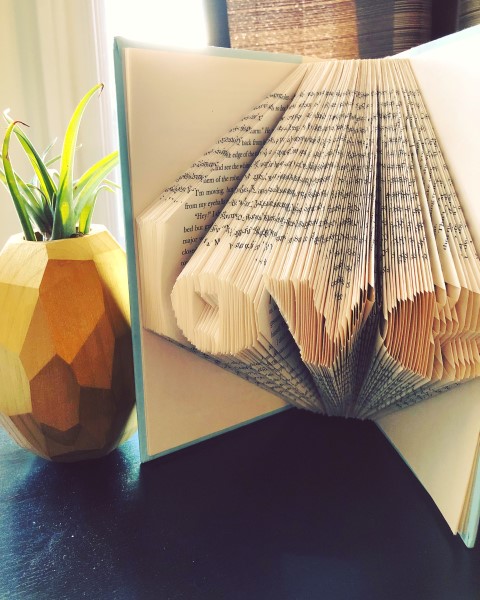
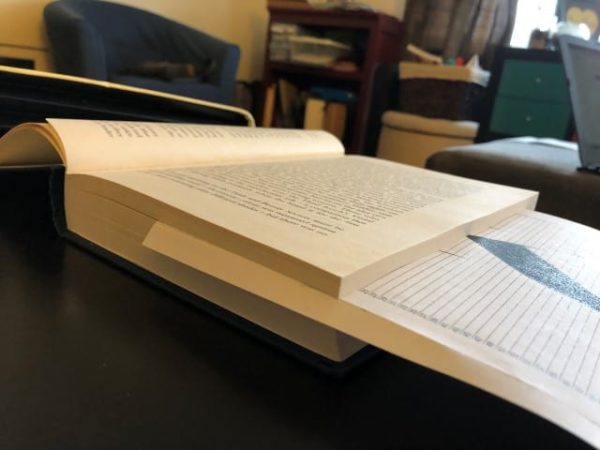
Repurpose hardcover books into this beautiful book folding art
Isn't this the coolest folded book art you have ever seen? I saw this manner of folded book at a store i day and idea, "I can make that myself!" After a few months of procrastination, some Googling and a couple misadventures in volume folding, I've learned some best practices to fold words onto the pages to make the near lovely folded book art.
These folded books brand for great gifts for weddings, baby showers, birthdays and a lovely addition to any abode or office. Follow my beginner volume folding tips below to become started.
How folded book art is created
To wrap my caput around this mind-extraordinary concept, I turned to Youtube to watch what this volume folding art procedure looked like. I watched a bunch of videos like this one below.
Gratuitous book folding art templates to download
For those of you that are not handy with Photoshop, here is a free volume folding template that you can impress yourself. Print the book folding blueprint in landscape orientation as it volition come out on more than one sail of paper.
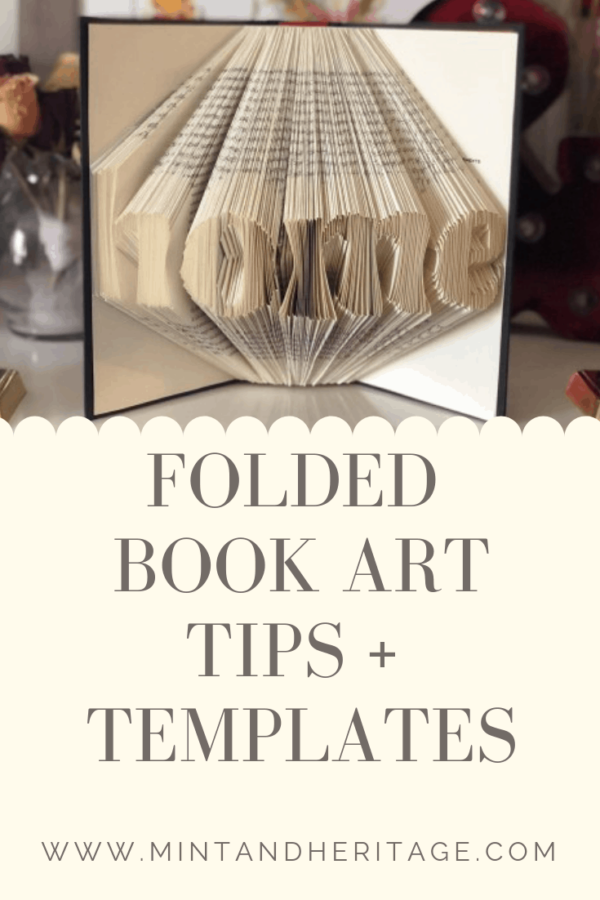
This complimentary volume folding art blueprint is for the word "dear." I have built it out in 3 different sizes depending on how many pages your book has. Cull the template that has less pages than the book you take. For example, if your volume has 476 pages, choose the smaller 450 folio book folding template to use. This is a deviation of 26 pages so count out half of the pages (thirteen) in the front end that will non be folded. Once washed post-obit the book folding template, you lot volition have thirteen pages left in the back every bit well).
Love – 350 folio book folding template
Beloved – 400 folio book folding template
Honey -450 page book folding template

Use dissimilar words to share your message: "dwelling" for housewarming gift, the name of a newborn for a baby gift and then on.
Choosing the right book to fold
- Find nice hardcover books at thrift stores around the city. I also love to stock upwards on books at almanac volume sales like CBC Calgary Reads Big Book Auction or the RESET Guild of Calgary book sale. I recommend buying books with at least 300-400 pages as that will normally cover nigh words to fold.
- I detect that 4-five letter words are the best length to piece of work with. I take done upward of 7 letters, merely the problem is that your book will fold into quite the crazy accordion which makes it hard to actually read the word. Less is better.
- Yous'll demand about 80 pages approximately per letter although this tin vary depending on how call up your page sheets are, how long the book is etc.
- Pull back the cover jacket on the hardcover book to meet what is underneath. All books have beautiful covers and colors to choose from especially if you're looking to do a specific décor theme. Sometimes you lot may want to notice a specific volume to employ if there'due south a special retentiveness attached or for someone's favourite author and the like. Steer away from the mystery volume section – I find the titles of the books don't make for very prissy gifts to other people lol.
- Make sure the edges of the pages are flat. Sometimes books are intentionally published with a deckle or "jagged" edge but this will make your arts and crafts project so much harder to fold.
- I prefer books that are non too tall and not too small. Every bit the folded volume art is meant to be home décor, you desire to discover an appropriately-sized book in both cover size and number of pages to employ.
- Cheque that the spine and pages are intact. You don't want pages to autumn out every bit you're folding
- Make sure pages are piece of cake to fold. I made the fault of buying an older hardcover volume that was quite well worn. The pages were very thick and "pulpy". As I was folding, the pages would start cracking and ripping easily. Needless to say, this was very frustrating to take it fall apart as I was trying to make something beautiful.
- Take an extra folding book handy to employ as practise. My kickoff folding book art was full of folding issues and turned out crap.
Easy book folding art tutorial
UPDATE November 2020: I have to give full credit to the former see-saw weblog for this tutorial! I take been following this method for years. At present that her site is no longer working, I am adding in this info hither, but we wouldn't exist able to do this without her astonishing expertise. Cheers!
There are a few different ways to make these books with many book folding templates available on the Net. But the folded book fine art tutorial below is my preferred method. Trust me, I looked at a lot of dissimilar options, only I like this particular method because it:
- Provides a very handy Photoshop template to update and alter or you can borrow one of mine above for free.
- This template allows yous to use whatsoever font and any word that you like.
- You tin can besides use books with different number of pages rather than having to notice a specific book to apply.
- No rulers or pencils are needed to mark off spacing and specs for every page. Yous just follow the template you create which is much simpler to employ.
Supplies needed for book folding
- Photoshop on your figurer
- Printer and 8.5 x 14 size paper (legal size)
- Scissors and/or box cutter
- Pencil
- Ruler
- Elastics (extra large)
- Heavy books or other weighted object
Setting upwardly the book folding template
Spend lots of time checking your Photoshop template to ensure it is done properly and correctly.
Step 1: Download this blank PDF template and save to your computer.
Step 2: Open the PDF in Photoshop. You lot will see a series of lines with page numbers on both ends.
For those of you that don't take admission to Photoshop, I'chiliad trying to effigy out how to make a template on a more than accessible tool like Word etc. but information technology doesn't seem to work. In the concurrently, inquire a friend who knows how to Photoshop to help you get your template organized!
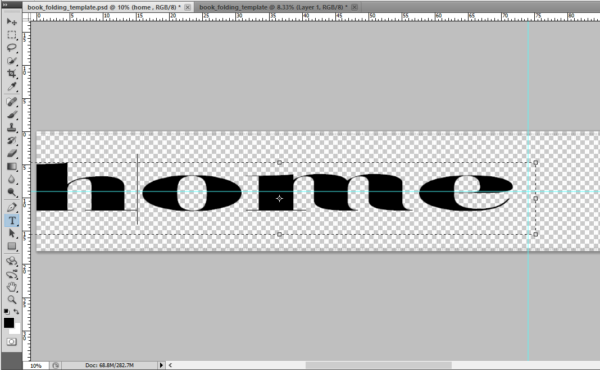
Pace three: Create a text box layer and input your chosen word due east.k. home, Jessica, dear, etc.
What the PDF template looks like
Increment the font size as needed to make the letters the peak you want them to be. Call up about how tall your book is and programme the letters accordingly leaving enough room at the superlative and lesser. I detect I am often over 200 or 300 pt size depending on the font chosen. Center your word on your template to all-time match the cover size of the book that yous are using.
Footstep four: Elevate your text box to the far left so that the beginning of your showtime letter is lined up to the very border.
Now zoom your screen to virtually fifty% so you tin read the page numbers on the bottom of the template. Scroll over to the last letter of your word while keeping the page numbers visible.
Step 5: You at present need to stretch your text box to friction match the number of pages in your book. With your mouse, select the right edge of your textbox (not the corners) and make the box wider . Pull the text box until the very final letter is lined up to the number of pages in your volume. It helps to set a ruler and then you easily detect the folio number.
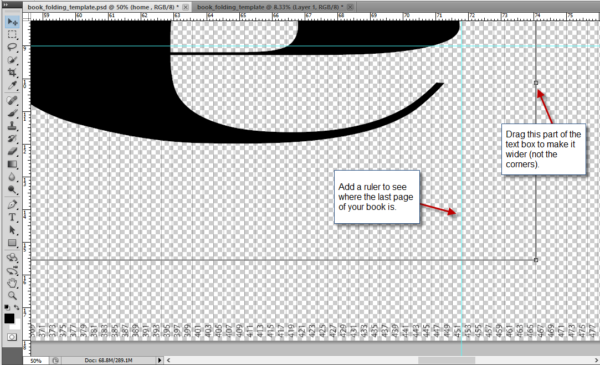
Stretch the textbox to the correct to stretch your word beyond the template. For instance, my volume is 451 pages so I set up a ruler at that marking. I and so dragged the very edge of the last letter to meet the 451 line.
More font and template tips
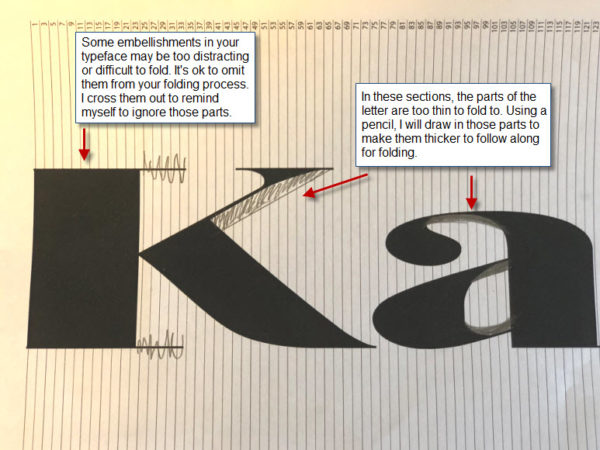
Fill up in the parts of the letters that are also thin. It will help with the folding process after on!
Make your messages "thicker" past hand
Play around with different fonts to make sure the messages are "thick". As yous fold the pages to lucifer the outline on the template you won't desire the letters to be besides skinny and hard to fold. I sometimes draw on my printed template to widen out parts of the letters that are too thin to fold to.
Interruptions in your font
Avoid having too many book folding breaks or "interruptions" in your chosen font/discussion. This happens with typefaces that have lots of embellishment like cursive fonts.
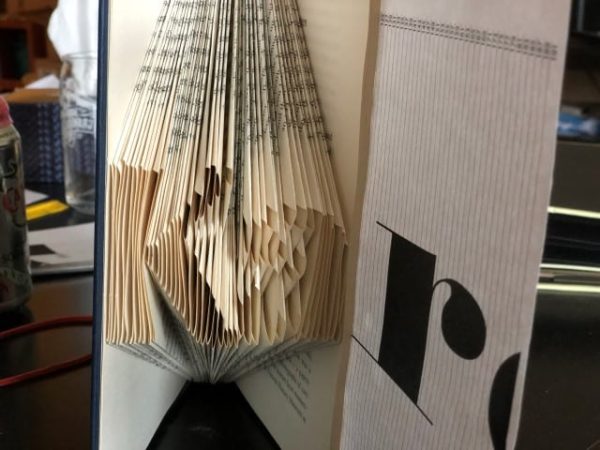
Attempt to have no more three interruptions in your design. Equally yous fold these parts of the give-and-take, you lot will find that you lose some item as you're trying to create multiple parts of a letter with a very limited number of pages available. See the motion-picture show below as an example.
In this example, there are 3 black sections or "interruptions" all coming together at the same line. Endeavour not to have more 3 interruptions in your blueprint every bit it can be too difficult to prove the detail of the typeface.
Printing your book folding template
It's time to print out your template! I prefer to use legal size paper equally it usually means but two sheets to work with. You can use regular eight.5 x xi paper as well, only you'll probably end up with 3-4 sheets for your template.
Yous'll need to play around with your printer settings to get the folio to come out properly. I adopt to save the Photoshop file as a PDF and then printing horizontally onto the pages. I notice everyone's printer is a piffling bit different and so yous may need to do a few impress runs until you go the template to come up out full page.
Print your pages out slap-up and straight – if it comes out crooked on the copier then your folding will end up crooked besides.
Do not print double-sided!
Setting up your volume and printed template
Then before we get folding, there are still a couple more preparation steps.
For your book, you demand to set up a folding starting bespeak on both the top and bottom.
Holding the book closed, looking down at the top of your book. Draw a line across all the pages of your book (nigh i inch away from the spine). Flip over and do the same affair to the bottom of the book too.
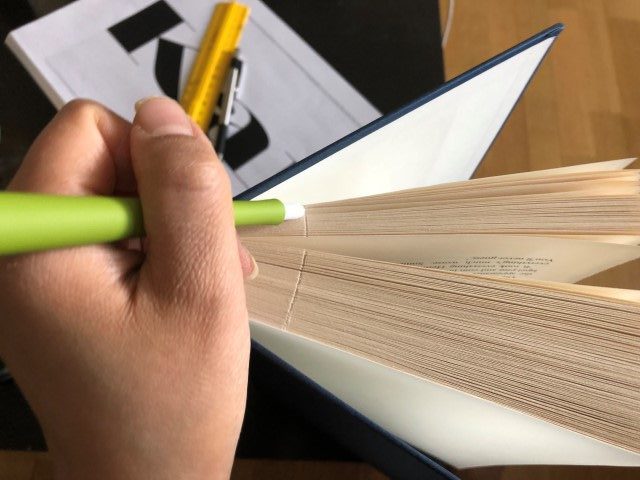
Use a box cutter or knife to cut a notch into the volume, about an inch away from the spine.
Using your box cutter or scissors, outset scratching out a small-scale divot along the line you just drew on the pages. This notch cutout will aid you run into where your fold line will first.
Complete the same notch cutout on both top and bottom of the book. Make certain this line is equal altitude from the spine on both sides.
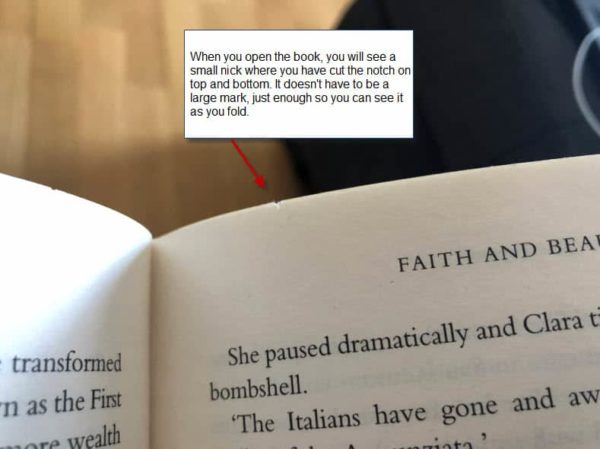
Make sure your notches are visible on every single page. Y'all volition need it as you fold!
For your printed template, we demand to create a folding edge to follow. On the long edge of your sheet (bottom of your word) create a 1 cm fold on your printed template. Do this to all sheets of your printout.
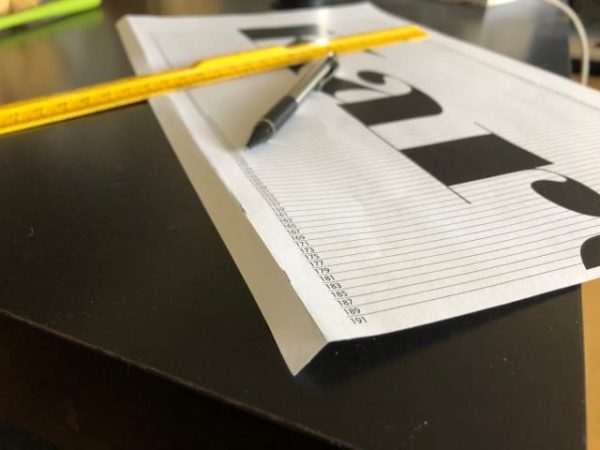
Create a modest 1cm fold along the bottom edge of your printed template.
How to fold the pages of the book
At present it's fourth dimension to finally get book folding!
Place your book on a flat surface with the spine facing away from you.
Open up your book into the first 100 pages or and then and place the folded edge of the printed template forth the left side of the book (which should be the bottom of the book). Pull the folded border tight forth the edge of the pages of the book equally this volition keep your book folding straight and even (you lot don't want your beautiful fine art to come out crooked!)
Pull the sheet in to start at line 1. Put the 100 pages you lifted dorsum downwardly.
Where the folded line on the template should sit in the book.
Open your book to page 1. Sometimes you may have a number of blank and introduction pages in the book earlier you get to the beginning page.
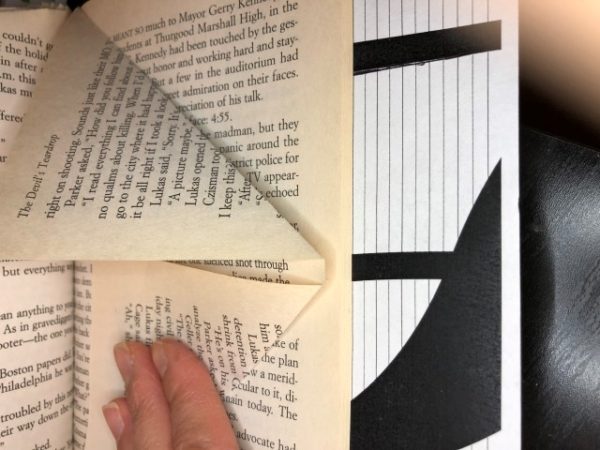
Starting with the left side of the page, accept the corner and fold from the left notch cutout to where the letter begins. Crease the fold well. Repeat on the correct side from notch to letter. Once both sides have been folded, flip the folio over.
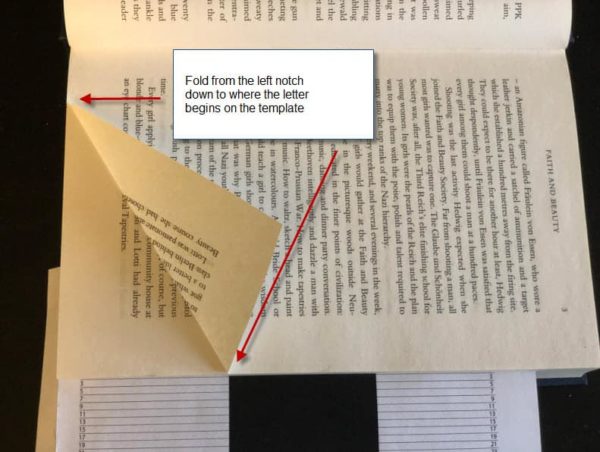
Always make certain your folds match up to the notch in your book.
Repeat the folding process from left to right past moving your template sheet up one line equally y'all fold the next page. Make sure the page number of the book is always matched upward with the line number on your template.
As y'all fold, you will accept to continually suit the template past moving it below another stack of pages. Continue the folded edge of your template tight on every page.
You'll become to a point where your template will then hitting the spine of the page. Just fold over or rip off the section you have already folded (go out a fiddling bit of a margin so you lot accept something to insert dorsum in the volume to go along folding).
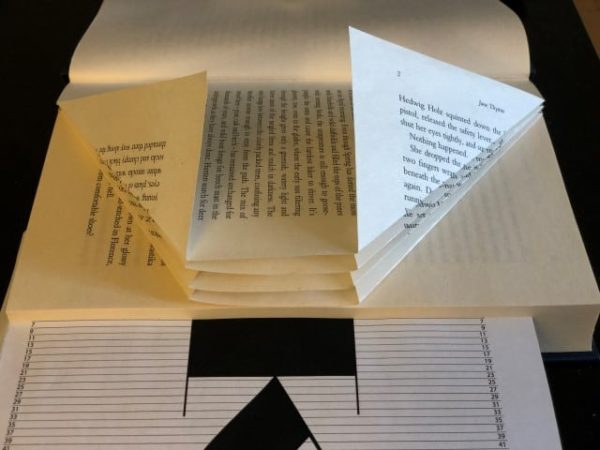
Proceed this folding process until all pages of your volume have been folded!
Go on following your template by matching page numbers and lines as your fold.
What to practice when there'southward more one department to fold
Y'all'll get to a betoken in your template where you'll have two or more than different sections of a letter bear witness up at the aforementioned line. At present what to do?
Starting on the left side, fold both corners of the page to match upward with the commencement role of the alphabetic character. Ignore the second role of the letter of the alphabet. Flip page over.
At present on the next page, fold the corners of the page for the 2nd office of the letter. Ignore the start part of the letter. Flip page over.
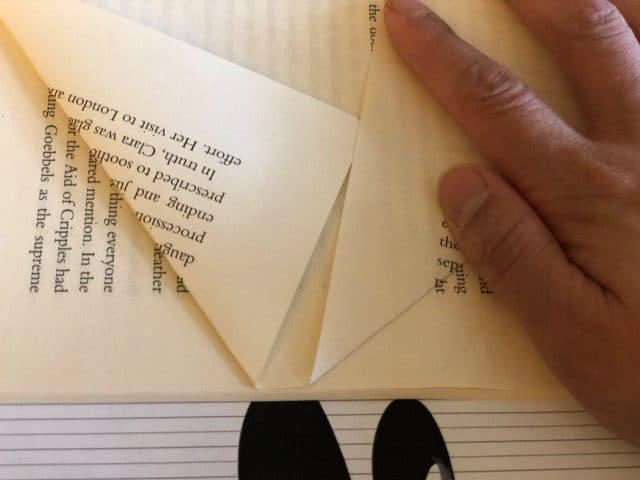
In this alphabetic character "a", fold the first part of the letter of the alphabet on i folio. Flip over so fold the second part of the letter of the alphabet on the adjacent folio. Continue going back and forth.
Continue alternating dorsum and forth until your template goes back to a single folding part once more. If your word ends up in 3 sections, follow the same premise of folding one role of the letter at a time until yous complete the section. This is why it is important to choose fonts that limit the number of interruptions as mentioned to a higher place.
Equally you lot fold, you'll start to meet your word come up to life!
Tips during the folding procedure
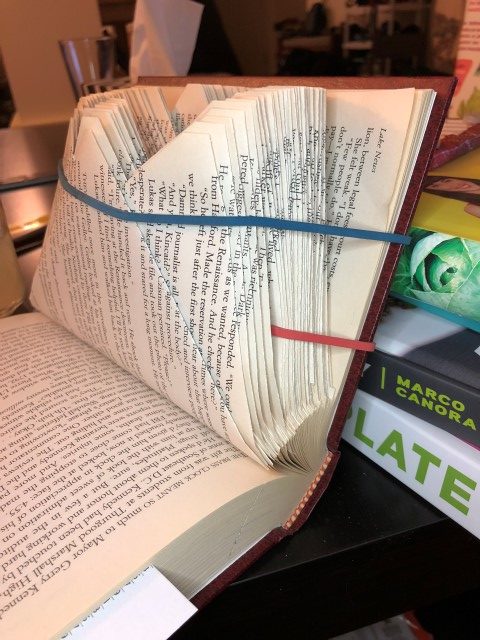
Apply elastics to concur your completed pages away from the pages y'all are nevertheless working on. Information technology as well helps to use heavy books or weights on manus to stack on top of the finished pages.
- Use heavy-duty books or weights to assistance proceed your volume from moving around as you fold.
- I like to utilise these extra big Staples rubber bands to keep the folded pages out of the way as I keep folding.
- With folded books that have half-dozen or more letters or if you notice the spine of the book is weak, you may want to tie a ribbon effectually the bottom role of the volume to go along your folded book art standing upright.
Are you set to go folding? Exercise makes perfect and I am totally here to assistance you along the manner. Comment below or message me @heyseto if you lot need whatever feedback on your folded book art. Good luck!
Good luck making the "best" folded volume art!
Source: https://www.mintandheritage.com/tips-folded-book-art-free-templates/
0 Response to "How to Make an S in a Book How to Make Folded Book Art Letters"
Post a Comment